Unreal: 내일배움캠프 7번 과제 - 이동 구현(Enhanced Input)
7번 과제는 캐릭터의 이동 구현이다. Character에 기본적으로 주어지는 이동 기능들이 아닌, Pawn에 직접 컨트롤러를 연결하고 기능을 구현해 Character처럼 만들 수 있는지를 연습하는 과제이다. 8번과제까지 해서 나름 플레이할 수 있는 게임을 만드는 것을 목표로, 이번엔 날라다니는 드론을 만들어보도록 하자.
조건
- Pawn 클래스 기반 플레이어 캐릭터
- 컴포넌트 추가
- Capsule/Box/Sphere/Component
- SkeletaMeshComponent
- SpringArmComponent
- CameraComponent
- RootComponent 설정, 계층 구조 구성
- DefaultPawn으로 설정
- Physics 설정
- 컴포넌트 추가
- Enhanced Input 매핑
- IA_Move
- IA_Look
- IMC
- 액션 바인딩
- 이동 및 회전
- 프레임 독립성
- AddActorLocalOffset() 기반 이동
- AddActorLocalRotation() 기반 회전 추가로 구현할 도전 과제들은 다음이 있다.
- 6축이동
- 상하전후좌우 이동
- Yaw/Pitch/Roll 회전 구현
- 로컬 기반 변화
- 중력/낙하
- Tick()기반 인공 중력
- 지면 충돌 감지
- 지면 충돌시 상태 초기화
- 에어 컨트롤(AirControl) 구현
- 공중에선 지상 이동속도의 30-50%
- 지상과 공중 상태의 분리 공중을 날라다니는 드론이 주된 게임으로 생각하고 있어서, 일부 구현과제는 전체적인 프로젝트 방향성과는 안맞을 수 있겠다. 그래도 일단 구현 방식 정도는 알아보도록 하자.
Pawn 클래스
먼저 Pawn 클래스부터 세팅해보자. C++클래스로 생성 후에 코드상에서 모든 컴포넌트들은 미리 구성/부착할 수 있다. Pawn을 상속받는 캐릭터로 사용할 클래스인 Drone을 만들고 구성했다.
1
2
3
4
5
6
7
8
9
10
11
12
13
14
15
16
17
18
19
20
21
22
23
24
25
26
27
28
29
30
31
32
33
34
35
36
37
38
39
40
41
42
43
44
45
46
47
48
// Drone.h
#pragma once

#include "CoreMinimal.h"
#include "GameFramework/Pawn.h"
#include "Drone.generated.h"

class UBoxComponent;
class UStaticMeshComponent;
class USpringArmComponent;
class UCameraComponent;
class UMovementComponent;
struct FInputActionValue;

UCLASS()
class TRICKYDRONEDELIVERY_API ADrone : public APawn
{
	GENERATED_BODY()

public:
	// Sets default values for this pawn's properties
	ADrone();

protected:
	// Called when the game starts or when spawned
	virtual void BeginPlay() override;

	UPROPERTY(VisibleAnywhere, BlueprintReadOnly, Category = Drone)
	UBoxComponent* BoxComp;

	UPROPERTY(VisibleAnywhere, BlueprintReadOnly, Category = Drone)
	UStaticMeshComponent* MeshComp;

	UPROPERTY(VisibleAnywhere, BlueprintReadOnly, Category = Drone)
	USpringArmComponent* SpringArmComp;

	UPROPERTY(VisibleAnywhere, BlueprintReadOnly, Category = Drone)
	UCameraComponent* CameraComp;

public:
	// Called every frame
	virtual void Tick(float DeltaTime) override;

	// Called to bind functionality to input
	virtual void SetupPlayerInputComponent(class UInputComponent* PlayerInputComponent) override;

};
1
2
3
4
5
6
7
8
9
10
11
12
13
14
15
16
17
18
19
20
21
22
23
24
25
26
27
28
29
30
31
32
33
34
35
36
37
38
39
40
41
42
43
44
45
46
47
48
49
50
51
52
53
// Drone.cpp
#include "Drone.h"
#include "Components/CapsuleComponent.h"
//#include "Components/SkeletalMeshComponent.h"
#include "Components/StaticMeshComponent.h"
#include "GameFramework/SpringArmComponent.h"
#include "Camera/CameraComponent.h"

// Sets default values
ADrone::ADrone()
{
 	// Set this pawn to call Tick() every frame.  You can turn this off to improve performance if you don't need it.
	PrimaryActorTick.bCanEverTick = true;

	BoxComp = CreateDefaultSubobject<UBoxComponent>(TEXT("BoxComp"));
	BoxComp->SetSimulatePhysics(false);
	RootComponent = BoxComp;


	MeshComp = CreateDefaultSubobject<UStaticMeshComponent>(TEXT("MeshComp"));
	MeshComp->SetupAttachment(RootComponent);


	SpringArmComp = CreateDefaultSubobject<USpringArmComponent>(TEXT("SpringArmComp"));
	SpringArmComp->TargetArmLength = 500.0f;
	SpringArmComp->bUsePawnControlRotation = false;
	SpringArmComp->SetRelativeRotation(FRotator(-10,0,0));
	SpringArmComp->SetupAttachment(RootComponent);

	CameraComp = CreateDefaultSubobject<UCameraComponent>(TEXT("CameraComp"));
	CameraComp->SetupAttachment(SpringArmComp, USpringArmComponent::SocketName);
}

// Called when the game starts or when spawned
void ADrone::BeginPlay()
{
	Super::BeginPlay();

}

// Called every frame
void ADrone::Tick(float DeltaTime)
{
	Super::Tick(DeltaTime);

}

// Called to bind functionality to input
void ADrone::SetupPlayerInputComponent(UInputComponent* PlayerInputComponent)
{
	Super::SetupPlayerInputComponent(PlayerInputComponent);

}
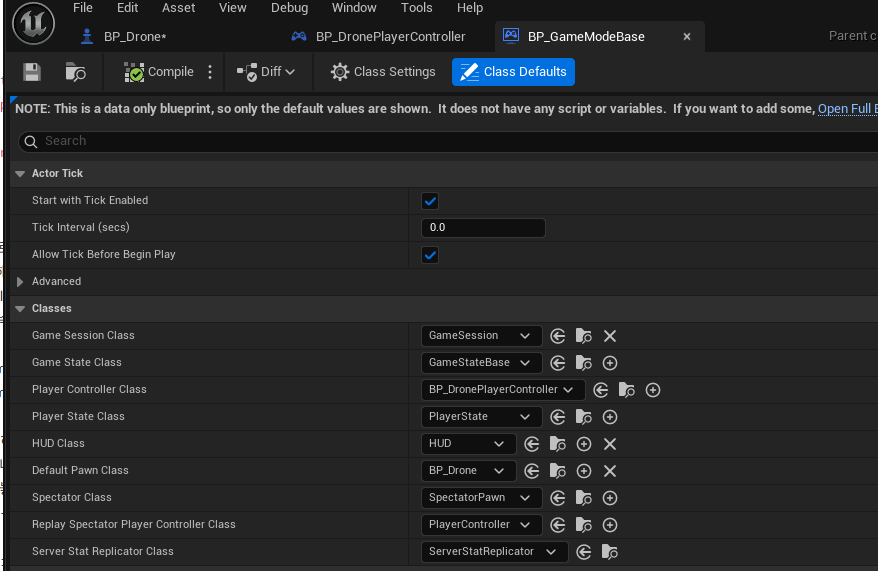
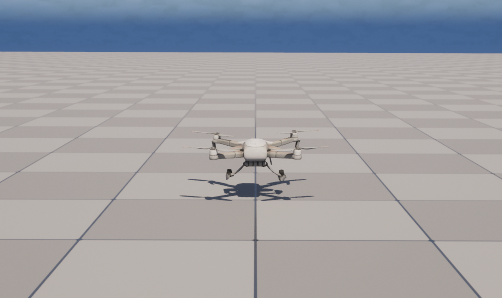
먼저 생성자에서 4개의 UPROPERTY()로 선언된 컴포넌트들을 초기화/구성한다. 액터의 가장 기본이 될 UBoxComponent를 먼저 생성해 RootComponent로 지정하는데, 이후 추가할 거의 모든 컴포넌트들은 여기 장착되게 된다. SimulatePhysics값을 false로 지정해야되는데, 일단 생성자에서 false로 지정하도록 해놓았다. 나중에 상속받는 블루프린트 클래스를 만들면 기본값이 false로 지정되어 있을 것이다. UCameraComponent처럼 USpringArmComponent와의 위치 종속 관계가 필요한 경우 개별적인 하위 컴포넌트로 넣게 된다. USpringArmComponent는 카메라를 장착하기 위한 소켓을 별도로 제공한다. 게임의 기본으로 사용할 Pawn으로 설정하기 위해서는 GameMode에서 설정을 해줘야 한다. 지금은 게임 규칙에 대해 정의하진 않을 것이니 간단하게 블루프린트로 임시 게임모드를 만들어 설정해놓자. 스태틱 매시를 드론 모델로 설정해놓으면, 게임 실행시 드론이 소환되는 것을 볼 수 있다.
Enhanced Input
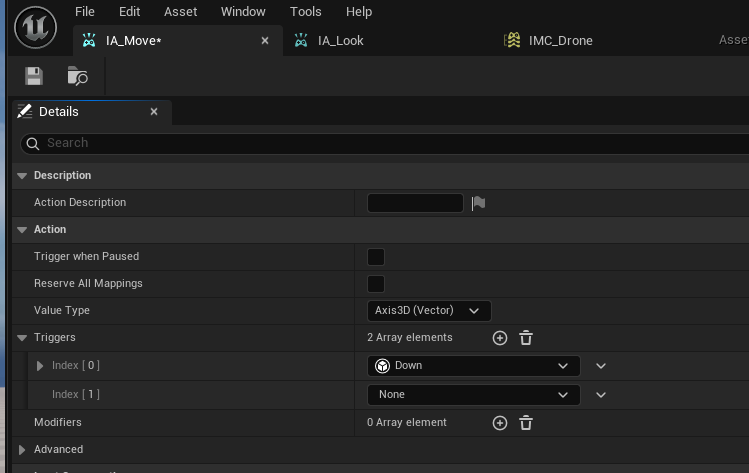
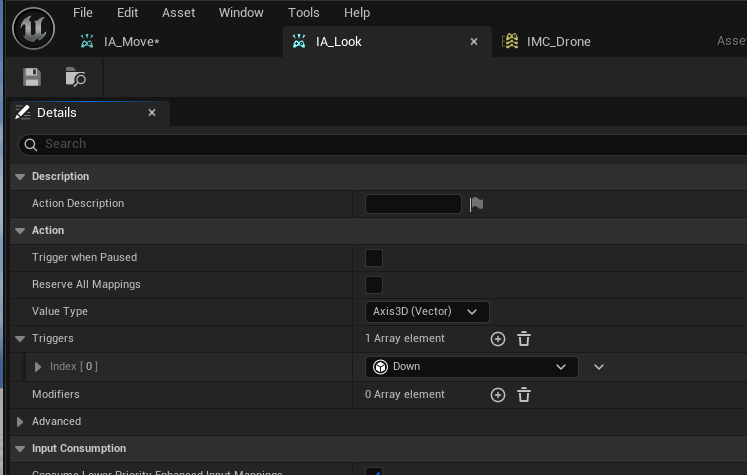
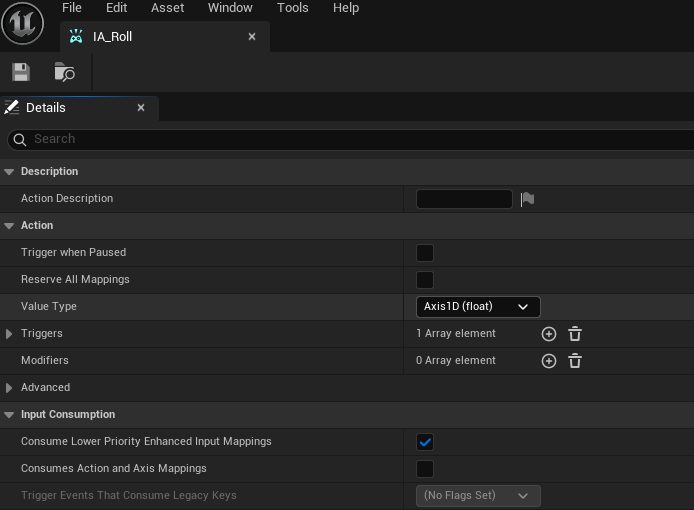
Enhanced Input은 언리얼 엔진 5.0부터 제공하는 입력 구현 방식이다. 기존에 코드상에서 입력과 함수를 직접 연결해야했던 구조랑 다르게, 입력 액션(Input Action, IA)과 입력 맵핑 콘텍스트(Input Mapping Context, IMC)를 이용해 결합도를 줄이고 수정이나 게임 진행 도중 변경의 용이성을 늘려준다. 먼저 IA_Move와 IA_Look을 만들어보자. 드론을 이용한 6방 이동을 구현할 것이니 IA_Move는 Axis_3D를 이용한 형태로 만들어 놓겠다. IA_Look과 IA_Roll은 Roll회전이 키보드 입력을 받기에 입력장치에 따라 구분하기위해 각각 2D, 1D IA로 구분했다.
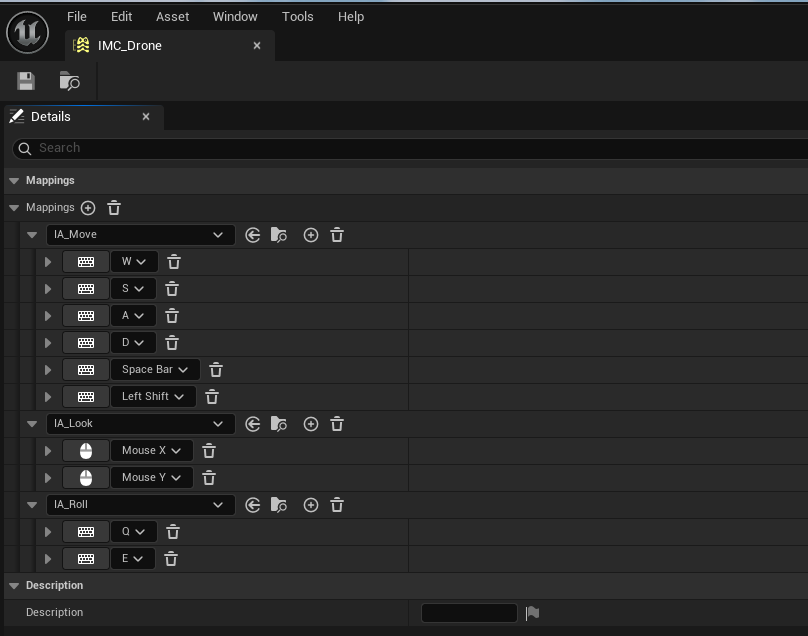
이들을 받아서 연결해주는 PlayerController를 만들자. 플레이어가 가지는 UEnhancedInputLocalPlayerSubsystem에 만들어준 IMC를 추가해준다.
1
2
3
4
5
6
7
8
9
10
11
12
13
14
15
16
17
18
19
20
21
22
23
24
25
26
27
28
29
30
31
32
33
 //DronePlayerController.h
#pragma once

#include "CoreMinimal.h"
#include "GameFramework/PlayerController.h"
#include "DronePlayerController.generated.h"

class UInputAction;
class UInputMappingContext;
/**
 *
 */
UCLASS()
class TRICKYDRONEDELIVERY_API ADronePlayerController : public APlayerController
{
	GENERATED_BODY()
public:
	ADronePlayerController();

	UPROPERTY(EditAnywhere, Category = Input)
	UInputMappingContext* IMC_Drone;

	UPROPERTY(EditAnywhere, Category = Input)
	UInputAction* IA_Move;

	UPROPERTY(EditAnywhere, Category = Input)
	UInputAction* IA_Look;

	UPROPERTY(EditAnywhere, Category = Input)
	UInputAction* IA_Roll;

	virtual void BeginPlay() override;
};
1
2
3
4
5
6
7
8
9
10
11
12
13
14
15
16
17
18
19
20
21
22
//DronePlayerController.cpp
#include "DronePlayerController.h"
#include "EnhancedInputSubsystems.h"

ADronePlayerController::ADronePlayerController():
	IMC_Drone(nullptr),
	IA_Move(nullptr),
	IA_Look(nullptr)
{
}

void ADronePlayerController::BeginPlay()
{
	Super::BeginPlay();
	if (ULocalPlayer* LocalPlayer = GetLocalPlayer()) {
		if (UEnhancedInputLocalPlayerSubsystem* Subsystem = LocalPlayer->GetSubsystem<UEnhancedInputLocalPlayerSubsystem>()) {
			if (IMC_Drone != nullptr) {
				Subsystem->AddMappingContext(IMC_Drone, 0);
			}
		}
	}
}
이렇게 입력 준비까진 완료되었다. 실제 키가 입력되었을 때 호출되는 부분까진 준비됬다.
이동/회전
호출로만 끝나면 안되고 움직임도 필요하다. 먼저 호출될 Drone클래스에서 어떤 함수가 어떤 IA와 연결될지 정해줘야 한다. EnhencedInput을 사용함이 확인되면, 플레이어 컨트롤러를 확인 후 존재하는 IA들에 대해 함수와 바인딩한다.
1
2
3
4
5
6
7
8
//Drone.h
	UPROPERTY(EditAnywhere, BlueprintReadOnly, Category = Drone)
	int Speed;

	UFUNCTION()
	void Move(const FInputActionValue& Value);
	UFUNCTION()
	void Look(const FInputActionValue& Value);
1
2
3
4
5
6
7
8
9
10
11
12
13
14
15
16
17
18
19
20
21
// Drone.cpp
// Called to bind functionality to input
void ADrone::SetupPlayerInputComponent(UInputComponent* PlayerInputComponent)
{
	Super::SetupPlayerInputComponent(PlayerInputComponent);
	if (UEnhancedInputComponent* EnhancedInput = Cast<UEnhancedInputComponent>(PlayerInputComponent)) {
		if (ADronePlayerController* PlayerController = Cast<ADronePlayerController>(GetController())) {
			if (PlayerController->IA_Move) {
				EnhancedInput->BindAction(PlayerController->IA_Move, ETriggerEvent::Triggered, this, &ADrone::ChangeDesiredVelocity);
				EnhancedInput->BindAction(PlayerController->IA_Move, ETriggerEvent::Completed, this, &ADrone::ResetDesiredVelocity);
			}
			if (PlayerController->IA_Look) {
				EnhancedInput->BindAction(PlayerController->IA_Look, ETriggerEvent::Triggered, this, &ADrone::Look);
			}
			if (PlayerController->IA_Roll) {
				EnhancedInput->BindAction(PlayerController->IA_Roll, ETriggerEvent::Triggered, this, &ADrone::BeginRolling);
				EnhancedInput->BindAction(PlayerController->IA_Roll, ETriggerEvent::Completed, this, &ADrone::EndRolling);
			}
		}
	}
}
이제 각각의 함수들을 구현해줘야 한다. 먼저 이동부터 구현해보자. 간단한 방식은 AddActorLocalOffset/AddActorWorldOffset을 이용한 방식이라 할 수 있겠다.
1
2
3
4
5
6
7
8
9
10
11
12
13
14
15
16
// Drone.h
//...

UCLASS()
class TRICKYDRONEDELIVERY_API ADrone : public APawn
{
//...
	UPROPERTY(EditAnywhere, BlueprintReadOnly, Category = Drone)
	float Speed;

	UFUNCTION()
	void Move(const FInputActionValue& Value);

	FVector CurrentVelocity;	//Movement veclocity
	FVector DesiredVelocity;	//Desired Movement Direction with speed
};
1
2
3
4
5
6
7
8
//Drone.cpp
void ADrone::Move(const FInputActionValue& Value)
{
	if (!Controller) return;
	const FVector Input = Value.Get<FVector>();
	FVector movement = Input * Speed * GetWorld()->GetDeltaSeconds();
	AddActorLocalOffset(movement);
}
이렇게 구현해도 움직임 자체는 문제 없지만, 드론을 움직인다 했을 때 뭔가 미끄러지듯 움직이는 물리 기반 이동보단, 입력에 맞추어 위치만 옮겨가는 느낌이 든다. 자연스런 움직임은 MovementComponent를 사용하면 보다 쉽게 구현할 수 있겠지만, 지금은 없이 하는게 과제 목표이다. 따라서 ChangeSpeed와 바인딩해 이동 방향을 조절해주고, Tick에서는 그 이동에 대해 Lerp로 부드럽게 보간해주는 방식으로 바꿔보겠다.
1
2
3
4
5
6
7
8
9
10
11
12
13
14
15
16
17
18
19
20
21
22
// Drone.h
//...

UCLASS()
class TRICKYDRONEDELIVERY_API ADrone : public APawn
{
//...
	UPROPERTY(EditAnywhere, BlueprintReadOnly, Category = Drone)
	float Speed;			//Movement Speed
	UPROPERTY(EditAnywhere, BlueprintReadOnly, Category = Drone)
	float MovementLerpRate;	//Rate to balance with inertia/DesiredVelocity
	UPROPERTY(EditAnywhere, BlueprintReadOnly, Category = Drone)
	float MovementZeroThreshold;	//Bottom Threshold to clear the roll value

	UFUNCTION()
	void ChangeDesiredVelocity(const FInputActionValue& Value);
	UFUNCTION()
	void ResetDesiredVelocity(const FInputActionValue& Value);

	FVector CurrentVelocity;	//Movement veclocity
	FVector DesiredVelocity;	//Desired Movement Direction with speed
};
1
2
3
4
5
6
7
8
9
10
11
12
13
14
15
16
17
18
19
20
21
22
23
24
25
26
27
28
29
30
31
32
33
34
35
36
37
38
39
// Drone.cpp
void ADrone::BeginPlay()
{
	Super::BeginPlay();
	CurrentVelocity = { 0, 0, 0 };
	DesiredVelocity = { 0, 0, 0 };
}

void ADrone::ChangeDesiredVelocity(const FInputActionValue& Value)
{
	if (!Controller) return;
	//Set desired movement direction to unit vector of local coordinate
	FVector Input = Value.Get<FVector>().GetSafeNormal();
	FVector Velocity(0.0);
	if (!FMath::IsNearlyZero(Input.X)) {
		Velocity += GetActorForwardVector() * Input.X;
	}
	if (!FMath::IsNearlyZero(Input.Y)) {
		Velocity += GetActorRightVector() * Input.Y;
	}
	if (!FMath::IsNearlyZero(Input.Z)) {
		Velocity += GetActorUpVector() * Input.Z;
	}
	DesiredVelocity = Velocity.GetSafeNormal();
}
void ADrone::ResetDesiredVelocity(const FInputActionValue& Value)
{
	//Reset desired movement velocity when the input disaapears
	DesiredVelocity = { 0, 0, 0 };
}
void ADrone::Tick(float DeltaTime)
{
	Super::Tick(DeltaTime);

	//Add Movement
	CurrentVelocity = FMath::Lerp(CurrentVelocity, DesiredVelocity * Speed, FVector(MovementLerpRate));
	if (CurrentVelocity.Length() < MovementZeroThreshold) CurrentVelocity = FVector(0.0);
	AddActorWorldOffset(CurrentVelocity * DeltaTime);
}
부드럽게 미끄러지는 드론 특유의 움직임을 어느정도 구현했다. 선형보간으로 기존의 속도와 목표되는 속도를 보간하기에 관성같은 움직임을 보인다.

다음은 회전과 롤링을 구현해보자. AddControllerYawInput()등을 사용하면 간단한데, 과제에서 사용하면 안된다고 하니, AddActorLocalRotation()을 기반으로 만들어보자. Look에서는 마우스 입력값에 따라 액터를 회전시키고, BeginRolling과 EndRolling은 롤 회전을 적용한다. 롤 회전 입력이 없을때는 자연스럽게 지면과 같은 방향으로 FInterpoTo()를 이용해 보간하며 정렬한다.
1
2
3
4
5
6
7
8
9
10
11
12
13
14
15
16
17
18
19
20
21
22
// Drone.h
UCLASS()
class TRICKYDRONEDELIVERY_API ADrone : public APawn
{
	//...
protected:
	UPROPERTY(EditAnywhere, BlueprintReadOnly, Category = Drone)
	float RollLerpRate;		//Rate to rebalance after rolling
	UPROPERTY(EditAnywhere, BlueprintReadOnly, Category = Drone)
	float RollZeroThreshold;	//Bottom Threshold to clear the roll value

	bool IsRolling;			//whether the roll input in on

	//...
	UFUNCTION()
	void Look(const FInputActionValue& Value);
	UFUNCTION()
	void BeginRolling(const FInputActionValue& Value);
	UFUNCTION()
	void EndRolling(const FInputActionValue& Value);
	//...
};
1
2
3
4
5
6
7
8
9
10
11
12
13
14
15
16
17
18
19
20
21
22
23
24
25
26
27
28
29
30
31
32
33
34
35
36
37
38
39
40
41
42
43
44
45
46
47
48
49
50
51
52
// Drone.cpp
void ADrone::Look(const FInputActionValue& Value)
{
	if (!Controller) return;
	//Rotate view using mouse input
	FVector2D Input = Value.Get<FVector2D>();
	if (!FMath::IsNearlyZero(Input.X)) {
		AddActorWorldRotation(FRotator::MakeFromEuler(FVector(0, 0, Input.X)));
	}
	if (!FMath::IsNearlyZero(Input.Y)) {
		//limit from -90 to 90 degrees
		if (Input.Y < 0 && GetActorRotation().Euler().Y > -90) {
			AddActorLocalRotation(FRotator::MakeFromEuler(FVector(0, Input.Y, 0)));
		}
		if (Input.Y > 0 && GetActorRotation().Euler().Y < 90.0) {
			AddActorLocalRotation(FRotator::MakeFromEuler(FVector(0, Input.Y, 0)));
		}
	}
}

void ADrone::BeginRolling(const FInputActionValue& Value)
{
	if (!Controller) return;
	float Input = Value.Get<float>();
	if (!FMath::IsNearlyZero(Input)) {
		AddActorLocalRotation(FRotator::MakeFromEuler(FVector(Input, 0, 0)));
		isRolling = true;
	}
}

void ADrone::EndRolling(const FInputActionValue& Value)
{
	if (!Controller) return;
	//Clear Rolling Status
	isRolling = false;
}

// Called every frame
void ADrone::Tick(float DeltaTime)
{
	//...

	//Reset Roll Rotation when not rolling
	if (!isRolling) {
		FRotator CurrentRotation = GetActorRotation();
		double NewRoll = FMath::FInterpTo(CurrentRotation.Roll, 0, DeltaTime, RollLerpRate);;
		if (FMath::Abs(NewRoll) < RollZeroThreshold) {
			NewRoll = 0;
		}
		SetActorRotation(FRotator::MakeFromEuler(FVector(NewRoll, CurrentRotation.Pitch, CurrentRotation.Yaw)));
	}
}
마우스와 Q/E조작에 맞추어 잘 돌아간다. 회전까지 관성을 구현하면 조작이 많이 힘들어질 것이기에 이정도가 좋을 수 있겠다.
중력/낙하
도전과제인 중력과 낙하를 구현해보자, 중력은 주어진 값만큼 Tick에서 가속도를 내도록 CurrentVelocity를 계산할 때 적용하도록 하면 될 것이다. 움직이지 않을때만 아래쪽으로 추가적인 가속을 받도록 조정했다.
1
2
3
4
5
6
7
8
9
10
11
12
13
// Drone.h
//...
UCLASS()
class TRICKYDRONEDELIVERY_API ADrone : public APawn
{
	//...
	public:
	//...
	protected:
	//...
	UPROPERTY(EditAnywhere, BlueprintReadOnly, Category = Drone)
	float GravityScale;	//Gravity strength
}
1
2
3
4
5
6
7
8
9
10
11
12
13
14
15
16
17
// Drone.cpp
void ADrone::Tick(float DeltaTime)
{
	Super::Tick(DeltaTime);

	//Add Movement
	if (FMath::IsNearlyZero(DesiredVelocity.Length())) { // Gravity Applied when not moving
		CurrentVelocity = FMath::Lerp(CurrentVelocity, DesiredVelocity * Speed, MovementLerpRate) + FVector::UnitZ() * GravityScale * DeltaTime;
	}
	else {// No Gravity when moving
		CurrentVelocity = FMath::Lerp(CurrentVelocity, DesiredVelocity * Speed, FVector(MovementLerpRate));
		if (CurrentVelocity.Length() < MovementZeroThreshold) CurrentVelocity = FVector(0.0);
	}
	AddActorWorldOffset(CurrentVelocity * DeltaTime);

	//...
}
 조종중이지 않을 때만 중력을 CurrentVelocity에 누적하도록 구현했다. 완벽하게 현실적인 중력이라고 할수는 없다. 중력으로 가속되어 누적되는 속도가 Lerp로 인한 보정으로 감쇄되기 때문에 실제 중력의 누적보다 천천히 누적된다. 만약 더 현실적으로 만들고자 한다면 Lerp에 기반하는 관성 구현방식대신, Lerp없이 DesiredVelocity의 감소를 따로 구현하고 이를 CurrentVelocity에 Gravity와 누적하는 방식으로 만들 수도 있겠다.
하지만 그러면 별도의 속도를 CurrentVelocity에서 체크하는 상황에서 지금 최종적으로 만들고자 하는게 아케이드 드론 조종 게임이니 오히려 게임의 방향성에는 적합한 약한 중력이라고 할 수도 있겠다. 돌덩이처럼 떨어지는 드론보단 잘 날라다니는 드론이여야 재미있지 않겠나? 다만 내 프로젝트에 넣기에는 중력이 있으면 조작이 까다로워질 것 같아 추후에 제거할 것 같다.
이제 바닥 충돌을 구현해보자. Tick()에 Z축으로 LineTrace를 날리고, 정해둔 거리까지 가까워지면 CurrentVelocity와 DesiredVelocity를 0으로 설정하는 코드를 위치를 업데이트 하기 전에 추가하면 되겠다.
1
2
3
4
5
6
7
8
9
10
11
12
13
// Drone.h
//...
UCLASS()
class TRICKYDRONEDELIVERY_API ADrone : public APawn
{
	//...
	public:
	//...
	protected:
	//...
	UPROPERTY(EditAnywhere, BlueprintReadOnly, Category = Drone)
	float BottomDistance;	//Bottom collision distance
}
1
2
3
4
5
6
7
8
9
10
11
12
13
14
15
16
17
18
19
20
21
22
23
24
25
26
27
28
29
// Drone.cpp
void ADrone::Tick(float DeltaTime)
{
	Super::Tick(DeltaTime);

	//Calculate Movement
	if (FMath::IsNearlyZero(DesiredVelocity.Length())) {// Gravity Applied when not moving
		CurrentVelocity = FMath::Lerp(CurrentVelocity, DesiredVelocity * Speed, MovementLerpRate) + FVector::UnitZ() * GravityScale * DeltaTime;
	}
	else {// No Gravity when moving
		CurrentVelocity = FMath::Lerp(CurrentVelocity, DesiredVelocity * Speed, FVector(MovementLerpRate));
		if (CurrentVelocity.Length() < MovementZeroThreshold) CurrentVelocity = FVector(0.0);
	}
	//Check if Colliding
	FHitResult Result;
	FCollisionQueryParams Params;
	Params.AddIgnoredActor(this);
	if (GetWorld()->LineTraceSingleByChannel(Result, GetActorLocation(), GetActorLocation() - FVector(0, 0, 1000), ECollisionChannel::ECC_Visibility, Params)) {
		float DistanceZ = (GetActorLocation() - Result.ImpactPoint).Length();
		if (DistanceZ < BottomDistance) {
			CurrentVelocity.Z = FMath::Max(CurrentVelocity.Z, 0);
			DesiredVelocity.Z = FMath::Max(DesiredVelocity.Z, 0);
		}
	}
	//AddMovement
	AddActorWorldOffset(CurrentVelocity * DeltaTime);

	//...
}
바닥에 충돌하면 잘 멈추는 것을 볼 수 있다 
에어 컨트롤
이미 날라다니는 드론을 구현했고 비행체가 목표였기에, 별도의 에어 컨트롤 구현은 지금 드론 캐릭터와는 안맞는다고 할 수도 있겠다. 대신 바닥에 충돌하면 느려지는 기능을 구현해보자. 아까의 LineTrace 부분에서 바닥에 충돌시 OnTheGround 조건을 활성화하는 코드를 추가하고, 해당 조건이 CurrentVelocity를 계산하는데 영향을 줘 바닥에 있으면 GroundSpeedRatio만큼 느려진다. 걸어다니는 캐릭터는 이에 반대로 구현하면 공중에서 느려지는 효과를 볼 수 있다.
1
2
3
4
5
6
7
8
9
10
11
12
13
14
15
// Drone.h
//...
UCLASS()
class TRICKYDRONEDELIVERY_API ADrone : public APawn
{
	//...
	public:
	//...
	protected:
	//...
	UPROPERTY(EditAnywhere, BlueprintReadOnly, Category = Drone)
	float GroundSpeedRatio;	//Ratio to slow down on the ground

	bool OnTheGround;		//whether it's touching the ground
}
1
2
3
4
5
6
7
8
9
10
11
12
13
14
15
16
17
18
19
20
21
22
23
24
25
26
27
28
29
30
31
32
33
34
35
36
// Drone.cpp
void ADrone::Tick(float DeltaTime)
{
	Super::Tick(DeltaTime);

	//Calculate Movement
	if (FMath::IsNearlyZero(DesiredVelocity.Length())) {// Gravity Applied when not moving
		CurrentVelocity = FMath::Lerp(CurrentVelocity, DesiredVelocity * (OnTheGround ? Speed * GroundSpeedRatio : Speed), MovementLerpRate) + FVector::UnitZ() * GravityScale * DeltaTime;
	}
	else {// No Gravity when moving
		CurrentVelocity = FMath::Lerp(CurrentVelocity, DesiredVelocity * (OnTheGround ? Speed * GroundSpeedRatio : Speed), FVector(MovementLerpRate));
		if (CurrentVelocity.Length() < MovementZeroThreshold) CurrentVelocity = FVector(0.0);
	}
	//Check if Colliding
	FHitResult Result;
	FCollisionQueryParams Params;
	Params.AddIgnoredActor(this);
	if (GetWorld()->LineTraceSingleByChannel(Result, GetActorLocation(), GetActorLocation() - FVector(0, 0, 1000), ECollisionChannel::ECC_Visibility, Params)) {
		float DistanceZ = (GetActorLocation() - Result.ImpactPoint).Length();
		if (DistanceZ < BottomDistance) {
			CurrentVelocity.Z = FMath::Max(CurrentVelocity.Z, 0);
			DesiredVelocity.Z = FMath::Max(DesiredVelocity.Z, 0);
			OnTheGround = true;	//On the Ground
		}
		else {//Not on the Ground
			OnTheGround = false;
		}
	}
	else { //Not on the Ground
		OnTheGround = false;
	}
	//AddMovement
	AddActorWorldOffset(CurrentVelocity * DeltaTime);

	//...
}
바닥에 닿으면 30%속도로 느려지도록 구현해놨다. 지면에서 떨어지면서 속도가 빨라지는걸 볼 수 있다. 이렇게 도전과제까지 모두 마무리됬다.
이번의 경험: 보간을 이용한 조작 개선, 컴포넌트화의 필요성
평소엔 MovementComponent를 이용한 캐릭터 조작을 주로 구현하고 따로 구현하는건 해보지 않았어서, 어떻게 하면 되겠다는 이해를 넘어 구현까지 해본건 오랜만인 것 같다. 그리고 날라다니는 캐릭터보단 인간형의 걸어다니는 캐릭터만 만들어봤어서, 색다른 조작감을 구현해볼 수 있었던 것 같다. 다른 한편으론 있는 기능을 쓰는게 얼마나 잘 모듈화되어있고 확장성이 좋은지도 느낀다. 현재는 Tick에서 많은 처리를 하기위해 기능들을 넣었는데, 이는 성능과 유지보수 관점에선 모듈화 되어있는 컴포넌트들에 비해 안좋다는 것은 분명하다.